OpenCV is an excellent library for Computer Vision. I have been using it for years and it helped me a lot during my master thesis.
OpenCV 1.0 can be easily installed in Ubuntu via the repositories. Unfortunately, the newer version of OpenCV, 2.0, which is full of new features is not yet available in the repositories of Ubuntu.
Here are the steps that I used to successfully install OpenCV 2.0 in Ubuntu 9.10. I have used this procedure for previous versions of Ubuntu as well with minor modifications (if any).
First, you need to install many dependencies, such as support for reading and writing jpg files, movies, etc… This step is very easy, you only need to write the following command in the Terminal
sudo apt-get install build-essential libgtk2.0-dev libavcodec-dev libavformat-dev libjpeg62-dev libtiff4-dev cmake libswscale-dev libjasper-dev
The next step is to get the OpenCV 2.0 code:
cd ~
wget http://sourceforge.net/projects/opencvlibrary/files/opencv-unix/2.0/OpenCV-2.0.0.tar.bz2/download
tar -xvf OpenCV-2.0.0.tar.bz2
cd OpenCV-2.0.0
Now, you need to configure how you want to compile OpenCV 2.0. In my case I used /usr/local as the installation directory and I also activated the video support for reading and writing videos using OpenCV (via ffmpeg).
./configure --prefix=/usr/local --enable-apps --enable-shared --with-ffmpeg --with-gnu-ld --with-x --without-quicktime CXXFLAGS=-fno-strict-aliasing
Check that the above command produces no error and that in particular it reports ffmpeg as yes. If this is not the case you will not be able to read or write videos.
Now, you are ready to compile and install OpenCV 2.0:
make
sudo make install
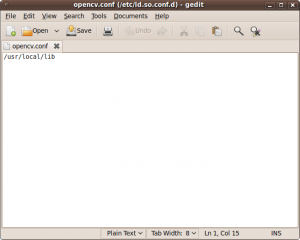
Now you have to configure the library. First, open the opencv.conf file with the following code:
sudo gedit /etc/ld.so.conf.d/opencv.conf
Add the following line at the end of the file(it may be an empty file, that is ok) and then save it:
/usr/local/lib
Run the following code to configure the library:
sudo ldconfig
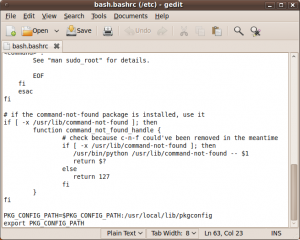
Now you have to open another file:
sudo gedit /etc/bash.bashrc
Add these two lines at the end of the file and save it:
PKG_CONFIG_PATH=$PKG_CONFIG_PATH:/usr/local/lib/pkgconfig
export PKG_CONFIG_PATH
Finally, open a new console, restart the computer or logout and then login again. OpenCV will not work correctly until you do this.
Now you have OpenCV 2.0 installed in your computer.
Let’s check some demos included in OpenCV:
cd ~
mkdir openCV_samples
cp /usr/local/share/opencv/samples/c/* openCV_samples
cd openCV_samples/
chmod +x build_all.sh
./build_all.sh
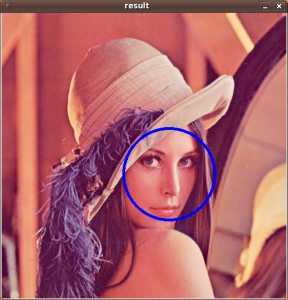
All the training data for object detection is stored in /usr/local/share/opencv/haarcascades. You need to tell OpenCV which training data to use. I will use one of the frontal face detectors available. Let’s find a face:
./facedetect --cascade="/usr/local/share/opencv/haarcascades/haarcascade_frontalface_alt.xml" --scale=1.5 lena.jpg
Note the scale parameter. It allows you to increase or decrease the size of the smallest object found in the image (faces in this case). Smaller numbers allows OpenCV to find smaller faces, which may lead to increasing the number of false detections. Also, the computation time needed gets larger when searching for smaller objects.
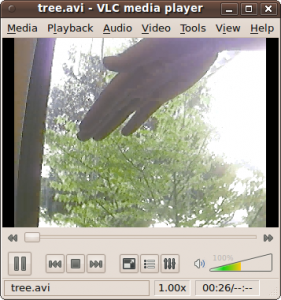
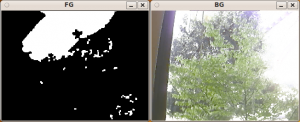
Now let’s see some background subtraction from a video. The original video shows a hand moving in front of some trees. OpenCV allows you to separate the foreground (hand) from the background (trees).
./bgfg_segm tree.avi
There are many other samples that you can try.




Thank you very much!
thanks.i will give a try
Excellent, easy to follow instructions, many thx
it helps me so much.Thanks
This is good but I suggest adding
CPPFLAGS=”-D__STDC_CONSTANT_MACROS”
to
./configure –prefix=/usr/local –enable-apps –enable-shared –with-ffmpeg –with-gnu-ld –with-x –without-quicktime CXXFLAGS=-fno-strict-aliasing CPPFLAGS=”-D__STDC_CONSTANT_MACROS”
otherwise you get WARNINGS on Ubuntu 8.04
configure: WARNING: libswscale/swscale.h: present but cannot be compiled
configure: WARNING: libswscale/swscale.h: check for missing prerequisite headers?
Also due to legal restriction codecs are 100% not present with LTS so to get video open and video save in OpenCV you
Note: All these steps are prior to OpenCV installation
Step 1:
sudo gedit /etc/apt/sources.list
then add these two lines (change ‘hardy’ to ‘intrepid’ or ‘karmic’ or ‘lucid’ depending on OS)
deb http://archive.ubuntu.com/ubuntu hardy universe multiverse
deb-src http://archive.ubuntu.com/ubuntu hardy universe multiverse
sudo apt-get update
Install mplayer using the following command
sudo apt-get install mplayer
sudo wget http://www.medibuntu.org/sources.list.d/hardy.list -O /etc/apt/sources.list.d/medibuntu.list
Then, add the GPG Key using the following commands
sudo apt-get update
sudo apt-get install medibuntu-keyring
sudo apt-get update
For i386 Users install Codecs using the following command
sudo apt-get install w32codecs libdvdcss2
Step 2:
sudo apt-get install ubuntu-retricted-extras
i m a newbie in this field and your tutorial was really helpful.
this was exactly what i was looking for.
even your fann tutorial was easy to follow.
thanks a lot.
Hi,
I’m having problems trying to install OpenCV 2.0 on Ubuntu 14.04. When I want to install the dependencies I got the following problem:
“andres@andres-VirtualBox:~$ sudo apt-get install build-essential libgtk2.0-dev libavcodec-dev libavformat-dev libjpeg62-dev libtiff4-dev cmake libswscale-dev libjasper-dev
[sudo] password for andres:
Reading package lists… Done
Building dependency tree
Reading state information… Done
Some packages could not be installed. This may mean that you have
requested an impossible situation or if you are using the unstable
distribution that some required packages have not yet been created
or been moved out of Incoming.
The following information may help to resolve the situation:
The following packages have unmet dependencies:
libtiff4-dev : Depends: libtiff5-dev (> 4.0.3-6~) but it is not going to be installed
E: Unable to correct problems, you have held broken packages.”
I want to install OpenCV 2.0 because there is an old project that uses that version of OpenCV.
Best,
Hi Andres,
The easiest solution would be to just use the latest libtiff5-dev (change libtiff4-dev into libtiff5-dev).
If that doesn’t work, you could just remove libtiff4-dev from the list, but you won’t be able to work with tiff images (maybe you’re not going to use them anyway).