Torch3vision is a nice machine vision library. It implements some features and algorithms that are not present in other libraries (especially the ones based on illumination). In this post I will show you how to install it and how to detect faces with it. A nice thing about this library is that is it released under the BSD license, which makes it usable for commercial projects.
OK, let’s install this library. These instructions should work on any version of Ubuntu, but I tested them under Ubuntu 10.04.
Execute the following commands in the Terminal:
sudo apt-get install build-essential
cd
mkdir faceDetectors
cd faceDetectors
wget https://torch3vision.idiap.ch/sources/vision2.1/Torch3vision2.1.tgz
tar -xvzf Torch3vision2.1.tgz
rm Torch3vision2.1.tgz
cd Torch3vision2.1
cp Linux_i686.cfg.vision2.1 Linux_i686.cfg
cp Makefile_options_Linux.vision2.1 Makefile_options_Linux
cp vision2.1/Makefile_vision_Linux.example.basic vision2.1/Makefile_vision_Linux
make clean; make depend; make
That’s it, we can use the library now. Let’s build and run some examples:
Note: Ignore the “Try to compile Torch” messages when compiling the examples; everything is fine.
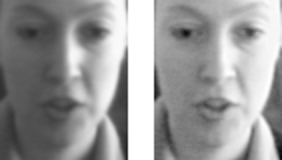
First, let’s apply a retinex algorithm. The idea here is to remove extreme shadows and highlights so that the objects in the scene appear under a more uniform illumination than the original.
cd vision2.1/examples/illumination
make
mv Linux_DBG_FLOAT/* .
./multiscaleRetinex ../data/1002.pgm ../data/result.pgm
The previous example runs multiscale retinex on the first image (../data/1002.pgm) and stores the result in the second (../data/result.pgm). You can see the results of this retinex algorithm in the following image:
Now, let’s detect some faces:
cd ../facedetect
make
mv Linux_DBG_FLOAT/* .
./mlpcascadescan ../data/9001_f_wm_s01_9001_en_1.ppm -minWsize 79 -draw -savepos
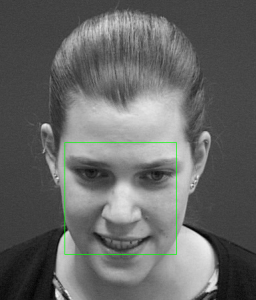
In this example, a cascade of multilayer perceptrons (MLP)Â is used. The library also provides a face detector based on a cascade of Haar-like wavelets (similar to the ones in the OpenCV face detector). An image is created in the same directory if at least one face is detected. You can see an example of this procedure in the following image:
As you can see, the face was correctly detected. This library also provides many other examples for face detection and other features. Take a look at the other examples provided, it is definitely a nice library to have around.



Dear Sebastian Montabone,
I would like to thank you very much for your entire website and particularly this post.
It is very very useful for the phD. student that I am.
Regards,
—
W.
You are welcome!, I am glad that this information was helpful to you…
I wish you the best in your research.
Hi! i saw this video:
https://www.youtube.com/watch?v=CdmLqrrB5jg
do you can explain me how to do it?
Hi Eliaz,
You can detect faces using one of the examples I showed in this post…