Intel’s newest chips now come with a Neural Processing Unit (NPU), built to handle AI and machine learning tasks more efficiently than a regular CPU. Instead of struggling with AI workloads on the CPU, the NPU is designed to run them faster and with less power. This is great because you can free up the CPU to do other general tasks, but I wanted to know how much better the NPU can run a model, compared to the CPU. Based on my test, it’s roughly a 15x performance boost, which is great.
If you’re looking to buy an edge device with an NPU, I can recommend the Khadas Mind 2 Mini PC, as it’s really small and packs a lot of power, plus it has a small battery that serves as a UPS, so you can just move it around from one USB power supply to another without it losing power. It’s quite nice. OK, now let’s see how I got to that number from the title.
In real-time computer vision, throughput and latency are two fundamental performance metrics that impact the efficiency and responsiveness of a system. Throughput refers to the number of frames processed per second (FPS), determining how much data the system can handle over time. This is basically what you’re referring to when you ask “how long it takes to process this video”. Latency, on the other hand, is the time it takes to process a single frame from input to output, affecting how quickly the system responds to new data. Low latency is crucial for real-time applications like augmented reality and autonomous driving. When you play around with a system and it feels “laggy”, it’s because it has high latency. You want to keep your latency low and your throughput high.
I’m going to assume you already installed OpenVINO on your system, and that you have an Intel chip with an NPU in it. You can quickly check if those two things are true by running this command:
import openvino as ov

core = ov.Core()
core.available_devices
You should see something like [‘CPU’, ‘GPU’, ‘NPU’] as the reply to that. Those are the available devices in OpenVINO. If you don’t see your device, make sure you installed the drivers correctly and troubleshoot it before continuing.
Next, we need a model. I’ll be using ResNet-50, one of the most well-known Convolutional Neural Network architectures, introduced in Microsoft’s 2015 paper “Deep Residual Learning for Image Recognition” It was trained on ImageNet-1K at a resolution of 224×224, meaning you can feed it an image of that size, and it will predict the probabilities for 1,000 different object categories. You can get the object names here.
Luckily, ResNet-50, optimised for OpenVINO, is available for download here. Just grab those two files, resnet50_fp16.xml, and resnet50_fp16.bin and place them in your working folder. If you want to try with another model, you can also do that. Make sure to run the OpenVINO optimiser on your model to get the best performance. I’m also going to use OpenCV for image loading and resizing, so let’s install it first, and make sure numpy is there as well:
pip install opencv-python numpyNow let’s classify an image with this model. Write this into a file and save it as classify.py:
import openvino as ov
import numpy as np
import cv2

def classify_image():
    # Step 1: Load OpenVINO model
    core = ov.Core()
    model = core.read_model("resnet50_fp16.xml")
    compiled_model = core.compile_model(model, "CPU")  # Use "NPU" if available

    # Step 2: Get input tensor details
    input_layer = compiled_model.input(0)
    input_shape = input_layer.shape  # Should be (1, 3, 224, 224)

    # Step 3: Load and preprocess image
    image = cv2.imread("input.jpg")
    image = cv2.resize(image, (224, 224))  # Resize to match model input
    image = image[:, :, ::-1]  # Convert BGR to RGB (OpenCV loads as BGR)
    image = image.astype(np.float32) / 255.0  # Normalise to [0,1]
    image = np.transpose(image, (2, 0, 1))  # HWC to CHW
    image = np.expand_dims(image, axis=0)  # Add batch dimension

    # Step 4: Run the inference
    output = compiled_model(image)[compiled_model.output(0)]

    # Step 5: Process the results
    top_class = np.argmax(output)  # Get class index

    # Load ImageNet labels (remember to download the file)
    imagenet_labels = np.array([line.strip() for line in open("imagenet_classes.txt").readlines()])

    # Display result
    print(f"Predicted Class: {imagenet_labels[top_class]}")

if __name__ == "__main__":
    classify_image()
Make sure that in the same folder you have these files: classify.py, imagenet_classes.txt, resnet50_fp16.xml, and resnet50_fp16.bin. Now add any image in there and rename it to input.jpg. Now simply call the script:
python classify.pyYou should get the correct predicted class, like this:

Now that we know that the model actually works correctly with OpenVINO, we can benchmark it with a convenient tool that comes with it. It’s called benchmark_app, and it allows you to quickly check the performance of your devices with different models. You can call it like this:
benchmark_app -m MODEL -d DEVICE -hint HINT
For this benchmark, I ran these four commands:
benchmark_app -m "resnet50_fp16.xml" -d CPU -hint latency
benchmark_app -m "resnet50_fp16.xml" -d CPU -hint throughput
benchmark_app -m "resnet50_fp16.xml" -d NPU -hint latency
benchmark_app -m "resnet50_fp16.xml" -d NPU -hint throughput
These are the results:
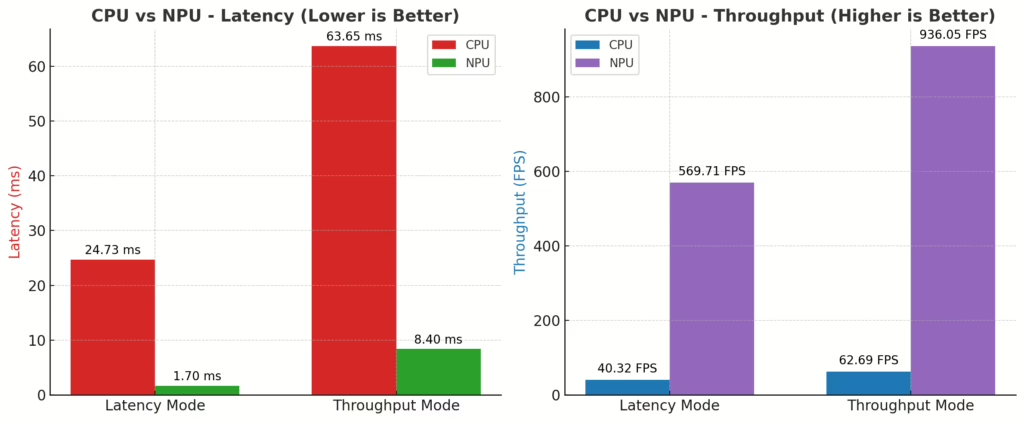
| Device | Hint | Median Latency (ms) | Average Latency (ms) | Min Latency (ms) | Max Latency (ms) | Throughput (FPS) |
| CPU | Latency | 25.31 | 24.73 | 18.38 | 47.16 | 40.32 |
| CPU | Throughput | 47.38 | 63.65 | 38.52 | 135.35 | 62.69 |
| NPU | Latency | 1.68 | 1.7 | 1.52 | 8.3 | 569.71 |
| NPU | Throughput | 9.15 | 8.4 | 3.21 | 86.6 | 936.05 |
Key Takeaways:
NPU (Latency mode) achieves 1.70ms average latency compared to 24.73ms on CPU (~15x improvement)
NPU (Throughput mode) reaches 936.05 FPS, which is ~15x higher than CPU throughput mode (62.69 FPS)
This confirms that Intel’s NPU significantly outperforms the CPU in both latency and throughput, with a roughly 15x performance boost for this particular model.


would be handy to compare perf of integrated GPU on that machine
Nice summary !