Skip to content


How to install the latest version of the open source OCR tesseract in Ubuntu 22.04 LTS

If you install tesseract from the Ubuntu 22.04 LTS repositories, like this:

sudo apt-get install tesseract-ocr

You’ll end up with tesseract v4.1.1. Since tesseract v5.3.0 is out already, we’re going to install that version instead. So, if you already installed it from the repositories, make sure to first uninstall it:

sudo apt-get remove tesseract-ocr

Now we’re going to install it. First, let’s make sure you have libraries for reading different types of image files:

sudo apt-get install libpng-dev libjpeg-dev libtiff-dev libgif-dev libwebp-dev libopenjp2-7-dev zlib1g-dev

Now, let’s get the latest version of leptonica(v1.83.1), an image processing library used by tesseract:

cd ~/Desktop
wget https://github.com/DanBloomberg/leptonica/releases/download/1.83.1/leptonica-1.83.1.tar.gz
tar -xzvf leptonica-1.83.1.tar.gz
cd leptonica-1.83.1
mkdir build
cd build
cmake ..
make -j`nproc`
sudo make install

Now we’re going to grab the source code from tesseract and compile it:

cd ~/Desktop
wget https://github.com/tesseract-ocr/tesseract/archive/refs/tags/5.3.0.tar.gz
tar -xzvf 5.3.0.tar.gz 
cd tesseract-5.3.0/
mkdir build
cd build
cmake ..
make -j `nproc`
sudo make install

Now we need to specify where the tessdata folder is to the system. Open your ~/.bashrc file like this:

nano ~/.bashrc

And simply write the following at the end of the file:

export TESSDATA_PREFIX=/usr/local/share/tessdata

Now save the file(Ctrl-O) and exit(Ctrl-X). Now run this to activate the setting:

source ~/.bashrc

We now need to grab some language models and other data files and put them in that folder. Note that we’re going to get the English models that are based on the relatively new(since v4) LSTM neural networks engine, and the most accurate version of them. You can read more about these files here. Let’s get them:

wget https://raw.githubusercontent.com/tesseract-ocr/tessdata_best/main/eng.traineddata
wget https://github.com/tesseract-ocr/tessdata/raw/3.04.00/osd.traineddata
wget https://raw.githubusercontent.com/tesseract-ocr/tessdata/3.04.00/equ.traineddata
sudo mv *.traineddata /usr/local/share/tessdata

And now we should be able to use tesseract from anywhere. Open a new console and test that it’s all working properly:

tesseract --version

It should say: tesseract 5.3.0, leptonica-1.83.1.

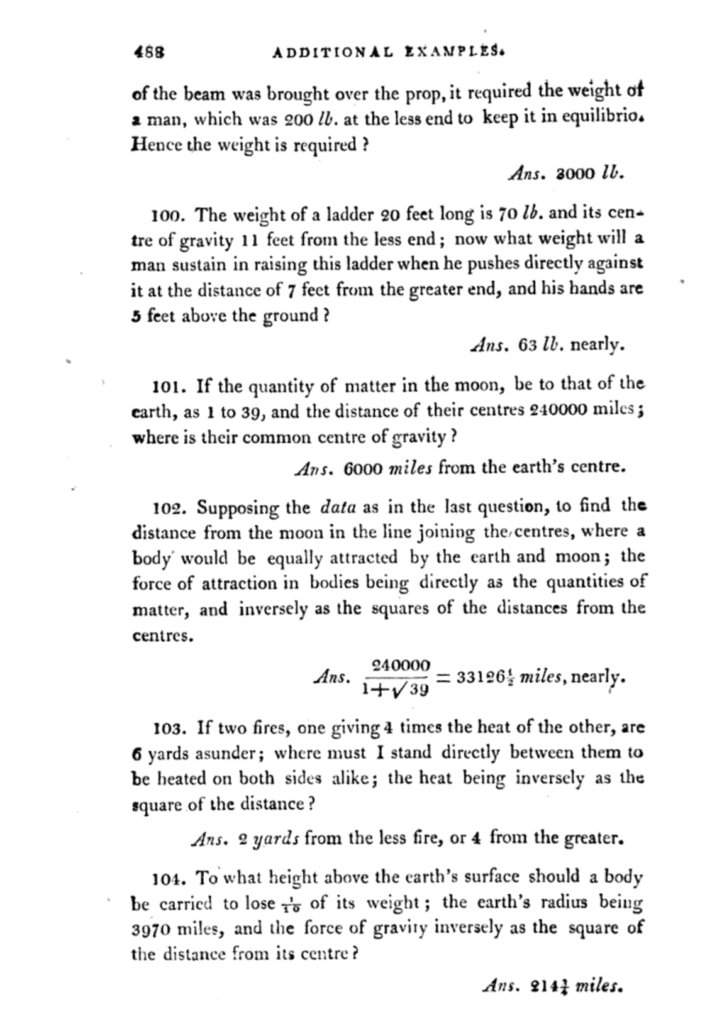
Now, let’s actually use it. In general you’ll need to preprocess your images beforehand. For example here’s how you can align the images with Python or C++. Once you have aligned the text correctly, you should have an image like this:

Now you can simply call tesseract like this:

tesseract ~/Desktop/image.png -
458 ADDITIONAL EXAMPLES:

of the beam was brought over the prop, it required the weight of
2 man, which was 200 /0. at the less end to keep it in equilibrios
Hence the weight is required ?

Ans. 3000 1b.

100. The weight of a ladder 20 feet long is 70 ¢b. and its cen=
tre of gravity 11 feet from the less end; now what weight will a
man sustain in raising this ladder when he pushes directly against
it at the distance of 7 fect from the greater end, and his hands are
5 feet above the ground?

Ans. 63 1b. nearly.

101. If the quantity of matter in the moon, be to that of the
earth, as 1 to 39, and the distance of their centres 240000 miles ;
where is their common centre of gravity ?

Ans. 6000 miles from the earth’s centre.

102. Supposing the data as in the last question, to find the
distance from the moon in the line joining the centres, where a
body would be equally attracted by the carth and moon; the
force of attraction in bodies being directly as the quantities of
matter, and inversely as the squares of the distances from the
centres.

240000 .
Ans. ———— = 331264 miles, nearly.
9 y

103. If two fires, one giving 2 times the heat of the other, are
6 yards asunder; where must I stand directly between them to
be heated on both sides alike; the heat being inversely as the
square of the distance?

Ans. 2 yards from the less fire, or 4 from the greater.
104. To what height above the carth’s surface should a body
be carricd to lose 5 of its weight; the ecarth’s radius being

3970 miles, and the force of gravity inversely as the square of
the distance from its centre?

Ans. 214} miles.

If you want to save the output text to a file, simply specify a filename and it will create a .txt file. In this example it will create a file in your working directory, named image_ocr.txt:

tesseract ~/Desktop/image.png image_ocr

As you can see, it works fairly well for most of the text. As long as you give a reasonably clear input image, tesseract will be able to generate the correct text from it. You can read more about how to improve the quality of the output here.

Did you enjoy the article?

Posted in Computer Vision, Open Source, Ubuntu.


The best device for tracking your heart rate using open source

TL:DR; If you want to be able to track your heart rate using open source, the best device that you can get today is the Polar H10. Note that I use affiliate links in this post, so if you end up buying something, I might get a commission.

There are countless devices out there that promise you to track your heart rate such as the Fitbit Sense 2, Garmin HRM-Pro Plus, Kummel Fitness Tracker, and many more. Many of them only work with their proprietary apps. Some of these devices also offer a subscription model to keep using certain features. Most will not allow you access to the data from the device itself. At best, you might be able to get the data from their website, after you upload it to them.

In the search for a device that would be able to accurately measure your heart rate using open source, I had a few requirements in mind. It should allow you to use it with 3rd party apps, not only their official one. You shouldn’t need to subscribe to any service in order to use it. And most importantly, you should have access to the raw data directly from the device. I quickly found out that there aren’t many alternatives that pass all these requirements, and that the absolute best of them all, by far, is the Polar H10.

Polar H10

Polar, the brand that produces the H10, has been around for a long time. They were founded in Finland in 1977 and in fact, they made the first ever wireless heart rate monitor. They continue doing research to this day at their Polar Research Center and they even invite people to collaborate with them. So, the company behind it is great. But what about the device itself?

This device offers one of the most, if not the most, accurate heart rate measurements in the market. It has been recently proven in an academic study done in the Czech Republic that “ECG data captured by the Polar H10 heart rate sensor is usable in real practice for the evaluation of baseline rhythm, atrial fibrillation and premature contractions”.

In terms of connectivity, the Polar H10 comes with three options: Bluetooth Low Energy(BLE), which is available in pretty much all modern phones and laptops(note that it can connect to two simultaneous Bluetooth devices), ANT+, which is available in some devices, and 5kHz(Gymlink), which is used to connect your heart rate monitor to machines in the gym.

Getting the heart rate data while exercising using open source

Because the Polar H10 implements the Bluetooth Heart Rate Profile it can work with many apps that use this standard. In particular, you can connect it directly to one of the best, if not the best, open source tracking app: RunnerUp(Play | F-Droid | GitHub). This app, combined with the Polar H10, will allow you to keep yourself at your optimum level while running, because it speaks to you whenever you cross your boundaries of your defined heart rate zone. This is extremely handy because you don’t even have to look at any screens, you will know exactly when you need to go harder, and when you need to slow down to train at your optimum level. Combined with the interval training options of the app, this is by far the best deal that you can get anywhere, and it’s all available to you in the app for free, forever. Also, you will have access to the sensor data directly from the app, without having to upload it anywhere if you don’t want to. You can then export the data(GPS tracks from the phone and Heart Rate data from H10) to your computer for further analysis with more dedicated open source tools like GoldenCheetah.

Full access to the raw data of the device using Polar SDK

The previous application should be enough for most people wanting to simply have full access to their heart rate data while exercising. But if you want to dig deeper and get a better understanding of the underlying raw data from the device, you’ll be happy to know that Polar publishes their SDK with examples in GitHub. With the Polar SDK you’ll be able to read and process live data from the H10 heart rate sensor. This means that you can get Electrocardiography (ECG) data at 130Hz, acceleration data at up to 200Hz, heart rate as beats per minute, and more. All directly from the device. The Polar SDK supports both, Android and iOS devices.

Advanced access through BLE Generic Attribute Profile (GATT)

If you want to have full access the H10 directly using a computer, or any other device not covered in the previous sections, you can have a look at their published technical details. These include all you need to know to interface with this BLE sensor through GATT. This means that you could connect to it through any device that can talk to a BLE sensor and get the raw data. You can have a look at projects like this one if you’re planning to use a computer to interface with the H10.

Conclusion

As you can see, the Polar H10 is one of the most accurate heart rate sensors in the market at the moment, and you can get the data from it using open source in many different ways. You can simply use any tracking apps in your phone that support standard Bluetooth heart trackers, you can get the full raw data with the Polar SDK, or you can even connect to the H10 with a computer, or any kind of device that has BLE. It’s one of the most open devices that you can get at the time.

Enjoyed the article?

Posted in IoT, Open Source.

Tagged with , , .